星期五, 12月 11, 2015
如何使用plink及putty遠端關閉Esxi Host
參考:
藉由plink+putty+PowerChute讓ESXi實體主機在市電中斷時進行關機
停電時讓ESXi Server 自動關機
Use Plink to Reboot VMware VMs
Shut down ESXi 5.1 guest VMs and the host (free edition) via SSH - the easy way!
Shutting Down ESXI and VMs During a Power Failure
How to gracefully shut down vsphere 5.x (ESXi Free) using an Eaton UPS (with IPM) and the command line
星期五, 12月 04, 2015
如何設定RouterOS的DNS利用OpenDNS阻擋有害網站
因應學術網路已不再提供網頁過濾功能,為了避免內部使用者上網時連到到色情、非法網頁,可以改用OpenDNS的方案,OpenDNS是一家提供開放式DNS查詢服務公司。
他們利用DNS提供了網頁過濾服務,有兩種免費版本:FamilyShield(家庭防護) 及OpenDNS Home (OpenDNS家用版,需註冊使用)
FamilyShield(家庭防護) 有提供兩組公開的DNS server,可提供過濾成人網站:
- 208.67.222.123
- 208.67.220.123
如果將你的電腦DNS改為上述的2個IP,則在上網查詢domanname時,若有非法的網站,則會自動導向一個提示網頁,幫你過濾成人網站。
設定的方式可以參考:https://free.com.tw/safer-and-faster-internet-by-opendns/
________________________________________________________________________________
OpenDNS的家用版,則提供更多的過濾設定,除了成人資訊外,還有以下55個項目可以依本身需求調整過濾項目。
不過,如果要使用這項功能,則必須先到OpenDNS HOME進行註冊,並登錄你的IP,才能使用,而且只能登錄一組IP。
如果我們家裡有多個使用者,那就要利用路由器的DNS查詢功能將路由器的DNS指到OpenDNS HOME 的2組DNS:
- 208.67.222.222
- 208.67.220.220
並登錄你的路由器IP,則此功能就能使用。
______________________________________________________________________________
如果本身內部有BIND DNS Server,則我們可將forward加上OpenDNS的IP,並且利用RouterOS的DNS查詢及NAT轉換來管控內部使用者在不需要修改電腦的DNS設定下,轉換使用OpenDNS提供的過濾功能,以下將示範如何設定:
一、設定流程:
- 連線到OpenDns網站 https://www.opendns.com/
- 註冊->收確認信->點選確認
- 登錄你的DNS Server IP->收確認信確認IP來源->
- 在Bind DNS Server加入forwards紀錄
forwarders {
208.67.222.222;
208.67.220.220;
}; - 重新啟動DNS Server
- 回到OpenDNS的個人Dashboard->Web Content Filtering選擇要過濾的項目
- 修改RouterOS的DNS指向
- 增加NAT規則
- 增加firewall規則拒絕外部利用RouterOS查詢
- 測試
二、環境介紹
RouterOS :
ether1為內部的LAN,IP為192.168.1.1
ether2為外部的WAN,IP為163.23.xxx.254
Bind DNS Server:
163.23.xxx.1
三、流程圖

四、設定方式
- 連線到OpenDns網站 https://www.opendns.com/,選擇PERSONAL,再選擇OpenDNS Home


- 填寫註冊資料,填寫送出後會出現設定的方式

如果【Where will you use the account】選擇【Household】不會出現其他需要填寫的資料,如果選【Education】則還要再填寫姓名、地址等資料,端視註冊者如何選擇
- 註冊資料送出後會出現以下頁面,這邊有教學步驟提供您不同設備修改DNS的方式

- 請打開信箱收確認信,然後點選確認

- 確認完後,登錄到OpenDNS的DashBoard,並點選【HOME】【Add a network】加入你的DNS Server IP(我們這邊是以163.23.xxx.1為例)


- 以上完成後,會出現以下訊息,提醒你到信箱收信確認你的IP來源,是否與你登錄的DNS IP是一致的。

- 修改收信的電腦IP為你登錄的DNS IP(163.23.xxx.1)(或是直接使用DNS Server來收信)然後再點選確認(Open DNS會反查點選確認信的電腦IP是否為你設定的DNS IP),如果你收信的電腦與登錄的IP一致,才會通過確認。

- IP確認後,請登入OpenDNS到Dashboard的【HOME】【Settings】【MyDNS】【Web Content Filitering】

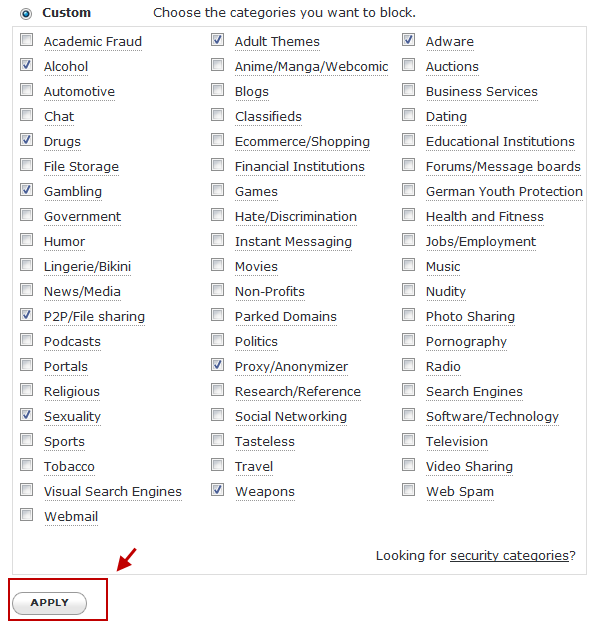
- 這裡我們可以設定要過濾的條件與項目,建議可選擇【Custom】自訂

- Custom的自訂項目共有55種可以選擇自訂

- 【Security】可以選擇【Enable phishing protection】及【Enable basic malware/botnet protection】可幫忙過濾釣魚、殭屍網站。

- 【Customization】可以自訂過濾顯示的圖樣與訊息

- 再來我們就可以將收信的電腦IP改回來,並在Bind DNS Server的nemed.conf加入forwards紀錄。
forwarders {
208.67.222.222;
208.67.220.220;
};
可參考原廠網站的說明(BIND based DNS server : Configure BIND to use OpenDNS via the shell and webmin) - 重新啟動DNS Server
- 修改RouterOS的DNS指向,本動作是希望RouterOS 內部網路的使用者不用更動DNS設定(也等於是強制使用者必須使用RouterOS的DNS),這邊會有兩個動作,一是啟用RouterOS內的【IP】【DNS】,由RouterOS向163.23.xxx.1這台Bind DNS Server查詢使用者上網所需的Domain,例如tw.yahoo.com,並將查詢結果catch(快取)在RouterOS資料庫中。

- 二是增加NAT規則,目的是讓使用者不管設什麼樣的DNS(例如google的DNS或中華電的DNS)都強制重導到RouterOS來查
這裡如果是使用指令則為
/ip firewall nat add chain=dstnat action=dst-nat to-addresses=192.168.1.1 to-ports=53 in-interface=ether1 dst-port=53 protocol=tcp
/ip firewall nat add chain=dstnat action=dst-nat to-addresses=192.168.1.1 to-ports=53 in-interface=ether1 dst-port=53 protocol=udp
註:這裡的192.168.1.1及ether1是RouterOS的LAN端的IP及interface的名稱
- 增加firewall規則,拒絕外部網路使用者利用本RouterOS查詢
/ip firewall add action=drop chain=input comment="Drop RouterOS UDP 53 Port Input" dst-address=163.23.xxx.254 dst-port=53 protocol=udp
/ip firewall add action=drop chain=input comment="Drop RouterOS TCP 53 Port Input" dst-address=163.23.xxx.254 dst-port=53 protocol=tcp
這邊的address=163.23.xxx.254 是RouterOS對外的WAN IP - 接著我們可以打開瀏覽器測試一些不合法的網站是否會出現以下的顯示訊息


- RouterOS 指定區網內DNS到路由器
- http://forum.mikrotik.com/viewtopic.php?t=77757
- Introducing FamilyShield Parental Controls
- routeros-dns-adblock
各類非法/AD網站資料庫
- https://getadblock.com/
- http://www.malwaredomains.com/
- http://someonewhocares.org/hosts/
- http://www.hosts-file.net/
chrome出現 ERR_CERT_AUTHORITY_INVALID
- Block Page Errors: Installing the Cisco Root CA
- Chrome (for Windows only) - HSTS Certificate Exception Instructions
- HSTS and Pinning Certificate Errors and BPB: "Your connection is not private" or "Cannot connect to the real domain.com"
- Block Page Errors: Installing the Cisco Root CA
- *.opendns.com Certificate errors - Adding Exceptions
星期二, 11月 03, 2015
RANSOMWARE DECRYPTOR
- https://noransom.kaspersky.com/
- How to remove CoinVault ransomware and restore your files
- Kaspersky WindowsUnlocker to fight ransomware
- 惡意程式 Cryptolocker 已破解
- 趨勢科技的Ransomware資料
- 防範ransomware的officescan server調整方式
- 如何使用 OfficeScan (OSCE) 和 Worry-Free Business Security/Services (WFBS/WFBS-SVC) 保護電腦避免感染勒贖軟體
- Using the Trend Micro AntiRansomware Tool in OfficeScan (OSCE)
- Free Kaspersky WindowsUnlocker Disinfects Ransomware
- 3 Ways to Install and Run Kaspersky Rescue Disk from USB Flash Drive
- The state of Ransomware in 2015
- Crypt0L0cke(新版)的截圖
- 付款給勒索病毒Crypt0L0cker 順利拿到解密檔
- 真實示範 CryptoWall:揭開最新勒索軟件的操作流程
如何解毒
- https://www.virustotal.com/
- How to rescue your PC from ransomware
- How to remove CryptoWall Virus(具參考價值)
- Dr.Web提供的線上解譯功能
- Remove XRTN Ransomware (Virus Removal)
- How to Remove Malware From Your Windows PC
- REMOVING 'POLICE-THEMED' RANSOMWARE
- Meister Penalty Document Ransomware Removal Guide
- 勒索病毒潛伏特徵
- 哪些檔案被加密,使用者可以檢查自己系統內的自動啟動註冊表
- 電腦被Crypt0L0cker病毒加密的解決心得
- How to Remove 'CryptoWall'
- How to remove CoinVault ransomware from your computer and restore your files
- Decrypt files with Decrypt_mblblock.exe – Decrypt Protect
- Bit Cryptor ransomware: decrypt files and remove virus
- Cisco Offers Free Decryption Tool For Ransomware Victims (TeslaCrypt )
- TESLACRYPT DECRYPTION TOOL
- Emsisoft releases Decrypter for the Randamant Ransomware Kit
- New helpme@freespeechmail.org Ransomware can be Decrypted for Free
- .vvv Extension / how_recover Ransomware Removal Guide
- Cryptolocker - Free Ransomware Decryption Tool Released
- How do I decrypt files encrypted by ransomware?
- Decrypt your files damaged by CTB Locker Virus.
- The 7 best ransomware removal tools - how to clean up Cryptolocker, CryptoWall and extortion malware
- How to Remove Helpme@freespeechmail.org Ransomware?
- Remove CTB Locker ransomware and recover encrypted personal files
- Ransomware creator apologizes for 'sleeper' attack, releases decryption keys
- 勒索軟體Locker Ransomware作者公開私鑰解密(有步驟教解密)
- CryptoLocker 的勒索軟體(Ransomware)解鎖方法
- 移除 CryptoWall 3.0 病毒
- 新種病毒Crypt0L0cker 檔案被加密 [解除方式]
- TeslaCrypt and Alpha Crypt Ransomware Information Guide and FAQ
- Remove TeslaCrypt RSA-4096. Can .vvv Files Be Restored?(含8個變種的過程及移除還原步驟)
- How to decrypt teslacrypt .vvv files?(Norton community)
星期日, 10月 25, 2015
SMC 8126L2常用指令
●設定校時與時區
Vty-0#configure
Vty-0(config)#clock timezone Taiwan hours 8 minute 0 after-UTC =>設定時區,timezone可自訂
Vty-0(config)#exit
Vty-0#configure
Vty-0(config)#sntp server 118.163.81.61 =>設定sntp server的IP,可以設3組,空格分隔
Vty-0(config)#sntp poll 60 =>設定送出查詢的間隔時間,預設16秒,此處設60秒,可設16-16384秒
Vty-0(config)#sntp client =>設定交換器為sntp client
Vty-0(config)#exit
Vty-0#show sntp
Current Time: Oct 25 19:47:34 2015
Poll Interval: 60
Current Mode: unicast
SNTP Status: Enabled
SNTP Server: 118.163.81.61 0.0.0.0 0.0.0.0
Current Server: 118.163.81.61
Vty-0#show calendar =>顯示日期與時間資訊
19:45:54 October 25 2015
Vty-0#
●更新firmware
Vty-0#copy tftp file
TFTP server IP address: 輸入TFTP 的IP
Choose file type:
1. config: 2. opcode: <1-2>: 2
Source file name: SMC8126L2_V1.4.6.1.bix
Destination file name: SMC8126L2_V1.4.6.1.bix
Write to FLASH Programming.
Write to FLASH finish.
Success.
Vty-0#configure
Vty-0(config)#boot system opcode:SMC8126L2_V1.4.6.1.bix
Success.
Vty-0(config)#exit
Vty-0#reload
System will be restarted. Continue?y
Session is waiting for rebooting..........................................
Vty-0#configure
Vty-0(config)#clock timezone Taiwan hours 8 minute 0 after-UTC =>設定時區,timezone可自訂
Vty-0(config)#exit
Vty-0#configure
Vty-0(config)#sntp server 118.163.81.61 =>設定sntp server的IP,可以設3組,空格分隔
Vty-0(config)#sntp poll 60 =>設定送出查詢的間隔時間,預設16秒,此處設60秒,可設16-16384秒
Vty-0(config)#sntp client =>設定交換器為sntp client
Vty-0(config)#exit
Vty-0#show sntp
Current Time: Oct 25 19:47:34 2015
Poll Interval: 60
Current Mode: unicast
SNTP Status: Enabled
SNTP Server: 118.163.81.61 0.0.0.0 0.0.0.0
Current Server: 118.163.81.61
Vty-0#show calendar =>顯示日期與時間資訊
19:45:54 October 25 2015
Vty-0#
●觀看某一埠(範例為24埠)學習的mac,可用來遠端觀看該埠是否有通
Vty-0#show mac-address-table interface ethernet 1/24
Interface MAC Address VLAN Type
--------- ----------------- ---- -----------------
Eth 1/24 00-02-5B-XX-05-62 1 Learned
Eth 1/24 00-08-22-XX-40-2F 1 Learned
Eth 1/24 00-08-22-XX-0E-EE 1 Learned
Eth 1/24 00-08-22-XX-31-0A 1 Learned
●查詢vlan id 1及vlan id 11的狀況
Vty-0#show vlan id 1
Default VLAN ID : 1
VLAN ID: 1
Type: Static
Name: DefaultVlan
Status: Active
Ports/Port Channels: Eth1/21(S) Eth1/23(S) Eth1/24(S)
Vty-0#show vlan id 11
Default VLAN ID : 1
VLAN ID: 11
Type: Static
Name:
Status: Active
Ports/Port Channels: Eth1/ 1(S) Eth1/ 2(S) Eth1/ 3(S) Eth1/ 4(S) Eth1/21(S)
Eth1/23(S) Eth1/24(S)
●儲存設定
Vty-0#copy running-config startup-config
Startup configuration file name [startup1.cfg]:按enter
Write to FLASH Programming.
Write to FLASH finish.
Success.
Startup configuration file name [startup1.cfg]:按enter
Write to FLASH Programming.
Write to FLASH finish.
Success.
●上傳設定檔到TFTP
Vty-0#copy file tftp
Choose file type:
1. config: 2. opcode: <1-2>: 1
Source file name: startup1.cfg
TFTP server IP address: TFTP的IP
Destination file name: 自行定義要存在TFTP Server上的設定檔名稱,如smc8126l2.cfg
Success.
●更新firmware
Vty-0#copy tftp file
TFTP server IP address: 輸入TFTP 的IP
Choose file type:
1. config: 2. opcode: <1-2>: 2
Source file name: SMC8126L2_V1.4.6.1.bix
Destination file name: SMC8126L2_V1.4.6.1.bix
Write to FLASH Programming.
Write to FLASH finish.
Success.
Vty-0#configure
Vty-0(config)#boot system opcode:SMC8126L2_V1.4.6.1.bix
Success.
Vty-0(config)#exit
Vty-0#reload
System will be restarted. Continue
Session is waiting for rebooting..........................................
DHCP snooping 與 IP Source Guard
###############################################
※關於dhcp snooping的觀念,請參考「防堵私自架設DHCP伺服器」這一篇文章
※關於底下將提到的ip source guard觀念,請參考「建構自我防禦不可不知-以交換器為基礎之安全防護觀念」
###############################################
身為網路管理人員,區域網路的環境中,如果有未經許可的路由器放在區網中,而此路由器又將DHCP Server功能開啟,對網管人員而言簡直是惡夢一場,因為區域網路中的電腦會租用到非法或不對的ip、gateway及dns資料,造成使用人員反應網路不通或有問題, 現在的Layer2交換器大多內建dhcp snooping功能,可將連接到正確及安全的dhcp server來源埠綁定為trust(信任),這樣在此交換器所不允許的埠下(設為untrust),只要是DHCP伺服器才會發送的【DHCPOffer】或【DHCPAck】這兩種訊息在Untrust介面下都會被攔阻下來,只允許透過Trust介面傳送。這樣,就不用擔心網路上私自架設的DHCP伺服器干擾內部網路的正常運作。
#############################################################
SMC 8126L2啟用 dhcp snooping 指令
ip dhcp snooping vlan 1
ip dhcp snooping vlan 2
ip dhcp snooping -- 大開關
UP-link Port 或是接 DHCP Server .. Port 要設定 TRUST
SW#1(config)#interface ethernet 1/24 - 接 DHCP Server01
SW#1(config-if)#ip dhcp snooping trust
若要取消dhcp snooping則下no ip dhcp snooping
###############################################
實例:
若交換器有切vlan id 11,22,33,44,第24埠上接dhcp server來源
則dhcp snooping啟用的步驟如下
Vty-0#configure
Vty-0(config)#ip dhcp snooping vlan 11 =>指定在vlan id 11啟用ip dhcp snooping
Vty-0(config)#ip dhcp snooping vlan 22
Vty-0(config)#ip dhcp snooping vlan 33
Vty-0(config)#ip dhcp snooping vlan 44
以上所有界面為untrust,即若有人架dhcp server則dhcp 送的【DHCPOffer】或【DHCPAck】訊息會被阻擋下來
我們必須加入至少一個dhcp server來源界面為trust
##本例設第24埠為trust界面
Vty-0(config)#interface ethernet 1/24
Vty-0(config-if)#ip dhcp snooping trust
Vty-0(config)#exit
Vty-0#show ip dhcp snooping =>顯示dhcp snooping資訊
Global DHCP Snooping status: disable
DHCP Snooping Information Option Status: disable
DHCP Snooping Information Policy: replace
DHCP Snooping is configured on the following VLANs:
1, 11, 22, 33, 44, 55, 66, 77, 88, 99, 101,
Verify Source Mac-Address: enable
Interface Trusted
---------- ----------
Eth 1/1 No
Eth 1/2 No
Eth 1/3 No
Eth 1/4 No
Eth 1/5 No
........
........
Eth 1/23 No
Eth 1/24 Yes
Eth 1/25 No
Eth 1/26 No
上面的Global DHCP Snooping status: 若為disable,則需開啟dhcp snooping 的大開關
開啟後,Switch會自動將DHCP分配到Client端的IP,建立一份表單(dhcp snooping binding table),有了這份表單,當我們之後要用到IP Source Guard的功能時,Switch就會根據Client端的IP及Mac Address是否在這份表單中來當作放行的依據,否則,Switch就不給上,這可以用來防止未經授權的使用者私自設定IP上網。
以下先設定Global DHCP Snooping status為Enabled
Vty-0#configure
Vty-0(config)#ip dhcp snooping
按「enter」
Vty-0(config)#exit
Vty-0#show ip dhcp snooping
看是否出現以下訊息
Global DHCP Snooping status: enabled
DHCP Snooping Information Option Status: enabled

Vty-0#show ip dhcp snooping binding =>show出dhcp snooping是否有在學習紀錄dhcp配出來的ip及MAC對映
MAC Address IP Address Lease(sec) Type VLAN Interface
----------------- --------------- ---------- -------------------- ---- ---------
00-xx-xx-xx-a5-59 172.20.x.1-- 86330 dhcp-snooping 77 Eth 1/18
00-xx-xx-xx-c3-63 172.20.x.1-- 86360 dhcp-snooping 77 Eth 1/13
以上先啟用後,之後若是啟用ip source guard功能,則可限制使用者只能拿到DHCP Server發的IP,若使用者自行設定IP是不能上的,若有額外必須設固定IP, 則需要手動加ip及mac到binding table中。
ip source guard 啟用後,每一埠有限制筆數(5-16筆,視交換器廠牌類型),因此若此埠下還有接網路交換器,而使用者多的話,則此埠最好不要開ip source guard以免底下使用者要不到IP
ip source-guard 啟用步驟(以port20啟用為例)
SW1(config)#interface ethernet 1/1-20
SW1(config-if)#ip source-guard sip-mac (需要IP和MAC在Binding Table中有資料且一致才行)
SW1(config-if)#exit
加入一筆資料mac為 11-11-11-11-11-11 IP為172.20.1.99,在port2的位置可接受固定IP
Vty-0(config)#ip source-guard binding 11-11-11-11-11-11 vlan 11 172.20.1.99 interface ethernet 1/2
###################################################################
LINUX DHCP Server 搭配交換器的 DHCP Option 82功能 . 可以控制用戶端的 DHCP IP 取得,例如我們可以設定使用者從哪個埠連上來,我就給哪個IP或哪個區段的IP。或是同一網段下,我們可以設定交換器第1埠給哪一個IP,第2埠給給哪一組的IP。也可以經由DHCP Server的LOG檔中看到使用者使用哪一台MAC Address裝置從哪一埠,哪一組vlan連上來。對於管理者管理內部網路是很有用的工具之一,log紀錄檔可參考下圖:

##################################################
Linux DHCP Server dhcpd.conf
###################################################
#
# Sample configuration file for ISC dhcpd for Debian
#
# Attention: If /etc/ltsp/dhcpd.conf exists, that will be used as
# configuration file instead of this file.
#
#
# The ddns-updates-style parameter controls whether or not the server will
# attempt to do a DNS update when a lease is confirmed. We default to the
# behavior of the version 2 packages ('none', since DHCP v2 didn't
# have support for DDNS.)
ddns-update-style none;
# option definitions common to all supported networks...
option domain-name "example.org";
#option domain-name-servers ns1.example.org, ns2.example.org;
default-lease-time 600;
max-lease-time 7200;
# If this DHCP server is the official DHCP server for the local
# network, the authoritative directive should be uncommented.
authoritative;
# Use this to send dhcp log messages to a different log file (you also
# have to hack syslog.conf to complete the redirection).
log-facility local7;
# No service will be given on this subnet, but declaring it helps the
# DHCP server to understand the network topology.
#subnet 10.152.187.0 netmask 255.255.255.0 {
#}
# This is a very basic subnet declaration.
#subnet 10.254.239.0 netmask 255.255.255.224 {
# range 10.254.239.10 10.254.239.20;
# option routers rtr-239-0-1.example.org, rtr-239-0-2.example.org;
#}
# This declaration allows BOOTP clients to get dynamic addresses,
# which we don't really recommend.
#subnet 10.254.239.32 netmask 255.255.255.224 {
# range dynamic-bootp 10.254.239.40 10.254.239.60;
# option broadcast-address 10.254.239.31;
# option routers rtr-239-32-1.example.org;
#}
# A slightly different configuration for an internal subnet.
#subnet 10.5.5.0 netmask 255.255.255.224 {
# range 10.5.5.26 10.5.5.30;
# option domain-name-servers ns1.internal.example.org;
# option domain-name "internal.example.org";
# option routers 10.5.5.1;
# option broadcast-address 10.5.5.31;
# default-lease-time 600;
# max-lease-time 7200;
#}
# Hosts which require special configuration options can be listed in
# host statements. If no address is specified, the address will be
# allocated dynamically (if possible), but the host-specific information
# will still come from the host declaration.
#host passacaglia {
# hardware ethernet 0:0:c0:5d:bd:95;
# filename "vmunix.passacaglia";
# server-name "toccata.fugue.com";
#}
# Fixed IP addresses can also be specified for hosts. These addresses
# should not also be listed as being available for dynamic assignment.
# Hosts for which fixed IP addresses have been specified can boot using
# BOOTP or DHCP. Hosts for which no fixed address is specified can only
# be booted with DHCP, unless there is an address range on the subnet
# to which a BOOTP client is connected which has the dynamic-bootp flag
# set.
#host fantasia {
# hardware ethernet 08:00:07:26:c0:a5;
# fixed-address fantasia.fugue.com;
#}
# You can declare a class of clients and then do address allocation
# based on that. The example below shows a case where all clients
# in a certain class get addresses on the 10.17.224/24 subnet, and all
# other clients get addresses on the 10.0.29/24 subnet.
#class "foo" {
# match if substring (option vendor-class-identifier, 0, 4) = "SUNW";
#}
#shared-network 224-29 {
# subnet 10.17.224.0 netmask 255.255.255.0 {
# option routers rtr-224.example.org;
# }
# subnet 10.0.29.0 netmask 255.255.255.0 {
# option routers rtr-29.example.org;
# }
# pool {
# allow members of "foo";
# range 10.17.224.10 10.17.224.250;
# }
# pool {
# deny members of "foo";
# range 10.0.29.10 10.0.29.230;
# }
#}
class "by-oui-mac" {
match if (binary-to-ascii (16,8,":",substring(hardware, 0, 4)) = "1:20:6a:8a")
or (binary-to-ascii (16,8,":",substring(hardware, 0, 4)) = "1:0:3:6b")
or (binary-to-ascii (16,8,":",substring(hardware, 0, 4)) = "1:0:7:eb");
log (info, (binary-to-ascii (16,8,":",substring(hardware, 0, 4))));
}
class "other" {
match if not (binary-to-ascii (16,8,":",substring(hardware, 0, 4)) = "1:20:6a:8a")
and not (binary-to-ascii (16,8,":",substring(hardware, 0, 4)) = "1:0:3:6b")
and not (binary-to-ascii (16,8,":",substring(hardware, 0, 4)) = "1:0:7:eb");
log (info, concat("other-mac",(binary-to-ascii (16,8,":",substring(hardware, 0, 4)))));
}
class "No_AID"{
match if not exists agent.remote-id; }
class "fixed6"{
match if binary-to-ascii(16, 8, ":", substring(option agent.remote-id, 2, 6)) = "70:72:cf:95:aa:5c" and binary-to-ascii (10, 8, "/", suffix ( option agent.circuit-id, 2)) = "1/5";
}
class "fixed7"{
match if binary-to-ascii(16, 8, ":", substring(option agent.remote-id, 2, 6)) = "70:72:cf:95:aa:5c"
and binary-to-ascii (10, 8, "/", suffix ( option agent.circuit-id, 2)) = "1/6";
}
class "port4"{ match if binary-to-ascii (10, 8, "/", suffix ( option agent.circuit-id, 2)) = "1/4"; }
# Test01
subnet 192.168.2.0 netmask 255.255.255.0 {
pool{
range 192.168.2.6;
allow members of "fixed6";
}
pool{
range 192.168.2.7;
allow members of "fixed7";
}
pool{
range 192.168.2.4;
allow members of "port4";
}
pool{
range 192.168.2.210 192.168.2.220;
option routers 192.168.2.2;
allow members of "by-oui-mac";
}
pool{
range 192.168.2.141 192.168.2.150;
allow members of "No_AID";
# MyNotebook
host E10089 {
hardware ethernet 20:6A:99:6F:2C:70;
fixed-address 192.168.2.33;
}
}
}
if exists agent.circuit-id
{
log (info, concat("Lease for ",
binary-to-ascii (10, 8, ".", leased-address),
" is connected to interface ",
binary-to-ascii (10, 8, "/",
suffix ( option agent.circuit-id, 2)),
" (add 1 to port number!), VLAN ",
binary-to-ascii (10, 16, "",
substring( option agent.circuit-id, 2, 2)),
" on switch ",
binary-to-ascii(16, 8, ":",
substring( option agent.remote-id, 2, 6))));
log (info, concat("Lease for ",
binary-to-ascii (10, 8, ".", leased-address),
" raw option-82 info is CID: ",
binary-to-ascii (10, 8, ".", option agent.circuit-id),
" AID: ",
binary-to-ascii(16, 8, ".", option agent.remote-id)));
}
else { log (info, "client is neither known no agent-id"); }
###############################################
說明:
substring(option agent.circuit-id,2,2) 代表偏移量2, 長度2. 這個表達式取出了Option 82中的VID部分
binary-to-ascii(10,16,"",substring(option agent.circuit-id,2,2)) 10表示十進制, 16表示16個bit. 這個表達式的結果就是把Option 82種的VLAN ID轉成10進制.
以上參考:Linux平臺上支持Option82的DHCP服務器配置
##################################################
參考資料:
※關於dhcp snooping的觀念,請參考「防堵私自架設DHCP伺服器」這一篇文章
※關於底下將提到的ip source guard觀念,請參考「建構自我防禦不可不知-以交換器為基礎之安全防護觀念」
###############################################
身為網路管理人員,區域網路的環境中,如果有未經許可的路由器放在區網中,而此路由器又將DHCP Server功能開啟,對網管人員而言簡直是惡夢一場,因為區域網路中的電腦會租用到非法或不對的ip、gateway及dns資料,造成使用人員反應網路不通或有問題, 現在的Layer2交換器大多內建dhcp snooping功能,可將連接到正確及安全的dhcp server來源埠綁定為trust(信任),這樣在此交換器所不允許的埠下(設為untrust),只要是DHCP伺服器才會發送的【DHCPOffer】或【DHCPAck】這兩種訊息在Untrust介面下都會被攔阻下來,只允許透過Trust介面傳送。這樣,就不用擔心網路上私自架設的DHCP伺服器干擾內部網路的正常運作。
#############################################################
SMC 8126L2啟用 dhcp snooping 指令
ip dhcp snooping vlan 1
ip dhcp snooping vlan 2
ip dhcp snooping -- 大開關
UP-link Port 或是接 DHCP Server .. Port 要設定 TRUST
SW#1(config)#interface ethernet 1/24 - 接 DHCP Server01
SW#1(config-if)#ip dhcp snooping trust
若要取消dhcp snooping則下no ip dhcp snooping
###############################################
實例:
若交換器有切vlan id 11,22,33,44,第24埠上接dhcp server來源
則dhcp snooping啟用的步驟如下
Vty-0#configure
Vty-0(config)#ip dhcp snooping vlan 11 =>指定在vlan id 11啟用ip dhcp snooping
Vty-0(config)#ip dhcp snooping vlan 22
Vty-0(config)#ip dhcp snooping vlan 33
Vty-0(config)#ip dhcp snooping vlan 44
以上所有界面為untrust,即若有人架dhcp server則dhcp 送的【DHCPOffer】或【DHCPAck】訊息會被阻擋下來
我們必須加入至少一個dhcp server來源界面為trust
##本例設第24埠為trust界面
Vty-0(config)#interface ethernet 1/24
Vty-0(config-if)#ip dhcp snooping trust
Vty-0(config)#exit
Vty-0#show ip dhcp snooping =>顯示dhcp snooping資訊
Global DHCP Snooping status: disable
DHCP Snooping Information Option Status: disable
DHCP Snooping Information Policy: replace
DHCP Snooping is configured on the following VLANs:
1, 11, 22, 33, 44, 55, 66, 77, 88, 99, 101,
Verify Source Mac-Address: enable
Interface Trusted
---------- ----------
Eth 1/1 No
Eth 1/2 No
Eth 1/3 No
Eth 1/4 No
Eth 1/5 No
........
........
Eth 1/23 No
Eth 1/24 Yes
Eth 1/25 No
Eth 1/26 No
上面的Global DHCP Snooping status: 若為disable,則需開啟dhcp snooping 的大開關
開啟後,Switch會自動將DHCP分配到Client端的IP,建立一份表單(dhcp snooping binding table),有了這份表單,當我們之後要用到IP Source Guard的功能時,Switch就會根據Client端的IP及Mac Address是否在這份表單中來當作放行的依據,否則,Switch就不給上,這可以用來防止未經授權的使用者私自設定IP上網。
以下先設定Global DHCP Snooping status為Enabled
Vty-0#configure
Vty-0(config)#ip dhcp snooping
按「enter」
Vty-0(config)#exit
Vty-0#show ip dhcp snooping
看是否出現以下訊息
Global DHCP Snooping status: enabled
DHCP Snooping Information Option Status: enabled

MAC Address IP Address Lease(sec) Type VLAN Interface
----------------- --------------- ---------- -------------------- ---- ---------
00-xx-xx-xx-a5-59 172.20.x.1-- 86330 dhcp-snooping 77 Eth 1/18
00-xx-xx-xx-c3-63 172.20.x.1-- 86360 dhcp-snooping 77 Eth 1/13
以上先啟用後,之後若是啟用ip source guard功能,則可限制使用者只能拿到DHCP Server發的IP,若使用者自行設定IP是不能上的,若有額外必須設固定IP, 則需要手動加ip及mac到binding table中。
ip source guard 啟用後,每一埠有限制筆數(5-16筆,視交換器廠牌類型),因此若此埠下還有接網路交換器,而使用者多的話,則此埠最好不要開ip source guard以免底下使用者要不到IP
ip source-guard 啟用步驟(以port20啟用為例)
SW1(config)#interface ethernet 1/1-20
SW1(config-if)#ip source-guard sip-mac (需要IP和MAC在Binding Table中有資料且一致才行)
SW1(config-if)#exit
加入一筆資料mac為 11-11-11-11-11-11 IP為172.20.1.99,在port2的位置可接受固定IP
Vty-0(config)#ip source-guard binding 11-11-11-11-11-11 vlan 11 172.20.1.99 interface ethernet 1/2
###################################################################
LINUX DHCP Server 搭配交換器的 DHCP Option 82功能 . 可以控制用戶端的 DHCP IP 取得,例如我們可以設定使用者從哪個埠連上來,我就給哪個IP或哪個區段的IP。或是同一網段下,我們可以設定交換器第1埠給哪一個IP,第2埠給給哪一組的IP。也可以經由DHCP Server的LOG檔中看到使用者使用哪一台MAC Address裝置從哪一埠,哪一組vlan連上來。對於管理者管理內部網路是很有用的工具之一,log紀錄檔可參考下圖:

##################################################
Linux DHCP Server dhcpd.conf
###################################################
#
# Sample configuration file for ISC dhcpd for Debian
#
# Attention: If /etc/ltsp/dhcpd.conf exists, that will be used as
# configuration file instead of this file.
#
#
# The ddns-updates-style parameter controls whether or not the server will
# attempt to do a DNS update when a lease is confirmed. We default to the
# behavior of the version 2 packages ('none', since DHCP v2 didn't
# have support for DDNS.)
ddns-update-style none;
# option definitions common to all supported networks...
option domain-name "example.org";
#option domain-name-servers ns1.example.org, ns2.example.org;
default-lease-time 600;
max-lease-time 7200;
# If this DHCP server is the official DHCP server for the local
# network, the authoritative directive should be uncommented.
authoritative;
# Use this to send dhcp log messages to a different log file (you also
# have to hack syslog.conf to complete the redirection).
log-facility local7;
# No service will be given on this subnet, but declaring it helps the
# DHCP server to understand the network topology.
#subnet 10.152.187.0 netmask 255.255.255.0 {
#}
# This is a very basic subnet declaration.
#subnet 10.254.239.0 netmask 255.255.255.224 {
# range 10.254.239.10 10.254.239.20;
# option routers rtr-239-0-1.example.org, rtr-239-0-2.example.org;
#}
# This declaration allows BOOTP clients to get dynamic addresses,
# which we don't really recommend.
#subnet 10.254.239.32 netmask 255.255.255.224 {
# range dynamic-bootp 10.254.239.40 10.254.239.60;
# option broadcast-address 10.254.239.31;
# option routers rtr-239-32-1.example.org;
#}
# A slightly different configuration for an internal subnet.
#subnet 10.5.5.0 netmask 255.255.255.224 {
# range 10.5.5.26 10.5.5.30;
# option domain-name-servers ns1.internal.example.org;
# option domain-name "internal.example.org";
# option routers 10.5.5.1;
# option broadcast-address 10.5.5.31;
# default-lease-time 600;
# max-lease-time 7200;
#}
# Hosts which require special configuration options can be listed in
# host statements. If no address is specified, the address will be
# allocated dynamically (if possible), but the host-specific information
# will still come from the host declaration.
#host passacaglia {
# hardware ethernet 0:0:c0:5d:bd:95;
# filename "vmunix.passacaglia";
# server-name "toccata.fugue.com";
#}
# Fixed IP addresses can also be specified for hosts. These addresses
# should not also be listed as being available for dynamic assignment.
# Hosts for which fixed IP addresses have been specified can boot using
# BOOTP or DHCP. Hosts for which no fixed address is specified can only
# be booted with DHCP, unless there is an address range on the subnet
# to which a BOOTP client is connected which has the dynamic-bootp flag
# set.
#host fantasia {
# hardware ethernet 08:00:07:26:c0:a5;
# fixed-address fantasia.fugue.com;
#}
# You can declare a class of clients and then do address allocation
# based on that. The example below shows a case where all clients
# in a certain class get addresses on the 10.17.224/24 subnet, and all
# other clients get addresses on the 10.0.29/24 subnet.
#class "foo" {
# match if substring (option vendor-class-identifier, 0, 4) = "SUNW";
#}
#shared-network 224-29 {
# subnet 10.17.224.0 netmask 255.255.255.0 {
# option routers rtr-224.example.org;
# }
# subnet 10.0.29.0 netmask 255.255.255.0 {
# option routers rtr-29.example.org;
# }
# pool {
# allow members of "foo";
# range 10.17.224.10 10.17.224.250;
# }
# pool {
# deny members of "foo";
# range 10.0.29.10 10.0.29.230;
# }
#}
class "by-oui-mac" {
match if (binary-to-ascii (16,8,":",substring(hardware, 0, 4)) = "1:20:6a:8a")
or (binary-to-ascii (16,8,":",substring(hardware, 0, 4)) = "1:0:3:6b")
or (binary-to-ascii (16,8,":",substring(hardware, 0, 4)) = "1:0:7:eb");
log (info, (binary-to-ascii (16,8,":",substring(hardware, 0, 4))));
}
class "other" {
match if not (binary-to-ascii (16,8,":",substring(hardware, 0, 4)) = "1:20:6a:8a")
and not (binary-to-ascii (16,8,":",substring(hardware, 0, 4)) = "1:0:3:6b")
and not (binary-to-ascii (16,8,":",substring(hardware, 0, 4)) = "1:0:7:eb");
log (info, concat("other-mac",(binary-to-ascii (16,8,":",substring(hardware, 0, 4)))));
}
class "No_AID"{
match if not exists agent.remote-id; }
class "fixed6"{
match if binary-to-ascii(16, 8, ":", substring(option agent.remote-id, 2, 6)) = "70:72:cf:95:aa:5c" and binary-to-ascii (10, 8, "/", suffix ( option agent.circuit-id, 2)) = "1/5";
}
class "fixed7"{
match if binary-to-ascii(16, 8, ":", substring(option agent.remote-id, 2, 6)) = "70:72:cf:95:aa:5c"
and binary-to-ascii (10, 8, "/", suffix ( option agent.circuit-id, 2)) = "1/6";
}
class "port4"{ match if binary-to-ascii (10, 8, "/", suffix ( option agent.circuit-id, 2)) = "1/4"; }
# Test01
subnet 192.168.2.0 netmask 255.255.255.0 {
pool{
range 192.168.2.6;
allow members of "fixed6";
}
pool{
range 192.168.2.7;
allow members of "fixed7";
}
pool{
range 192.168.2.4;
allow members of "port4";
}
pool{
range 192.168.2.210 192.168.2.220;
option routers 192.168.2.2;
allow members of "by-oui-mac";
}
pool{
range 192.168.2.141 192.168.2.150;
allow members of "No_AID";
# MyNotebook
host E10089 {
hardware ethernet 20:6A:99:6F:2C:70;
fixed-address 192.168.2.33;
}
}
}
if exists agent.circuit-id
{
log (info, concat("Lease for ",
binary-to-ascii (10, 8, ".", leased-address),
" is connected to interface ",
binary-to-ascii (10, 8, "/",
suffix ( option agent.circuit-id, 2)),
" (add 1 to port number!), VLAN ",
binary-to-ascii (10, 16, "",
substring( option agent.circuit-id, 2, 2)),
" on switch ",
binary-to-ascii(16, 8, ":",
substring( option agent.remote-id, 2, 6))));
log (info, concat("Lease for ",
binary-to-ascii (10, 8, ".", leased-address),
" raw option-82 info is CID: ",
binary-to-ascii (10, 8, ".", option agent.circuit-id),
" AID: ",
binary-to-ascii(16, 8, ".", option agent.remote-id)));
}
else { log (info, "client is neither known no agent-id"); }
###############################################
說明:
substring(option agent.circuit-id,2,2) 代表偏移量2, 長度2. 這個表達式取出了Option 82中的VID部分
binary-to-ascii(10,16,"",substring(option agent.circuit-id,2,2)) 10表示十進制, 16表示16個bit. 這個表達式的結果就是把Option 82種的VLAN ID轉成10進制.
以上參考:Linux平臺上支持Option82的DHCP服務器配置
##################################################
參考資料:
- DHCP snooping的觀念與運作方式及 IP source guard的設定
- 防堵私自架設DHCP伺服器
- Linux DHCP Option 82 設定
- How to configure Option 82 aware DHCP Server(Zyxel)
- Static Addressing Within a DHCP Structure
- ISC DHCP and option 82
- How to use DHCP option 82 on ECS4110-28T for assign different DHCP IP pools to clients?(Edge-Core KW)
- Sample configuration file for ISC dhcpd using Option 82
- DHCP Option 82, Cisco switches and routers and the ISC DHCP server
- Use DHCP Snooping, Option 82 and Filtering on AT-8800, AT-8600, AT-8700XL
- Linux平臺上支持Option82的DHCP服務器配置
- 測試DHCP Option82 設定了好久的dhcpd.conf
- Understand DHCP relay option 82 Agent Circuit ID (Zyxel KW)
- Rogue DHCP (wikipedia)
- ISC-DHCP-Server的文件
- 瞭解DHCP Snooping,IPsource Guard的好文章
星期一, 10月 12, 2015
DELTA(台達電)UPS的SNMP卡與Shutdown Agent
環境介紹:


目前測試的結果,目前支援度以APC UPS的支援度最高,網路上能查到的相關文件也最多(但多為英文),但要以一台UPS就能支援NAS+Esxi+guest OS有困難,群輝的NAS支援(可參考這篇 http://portable.easylife.tw/4399 )最好是有USB可直接接NAS。以SNMP卡送UPS關機訊號,目前測試台達電UPS,NAS會收到斷電訊息,但不會自己關機。Esxi 要能自行關機,查了許多資料及實做後才發現,幾乎都只支援Esxi的付費版,免費版執行關機指令會失敗,一般都會要求先安裝vMA,然後再vMA上安裝UPS原廠的UPS軟體去送關機指令給Esxi Server 。但是Guest OS的支援則沒問題。
台達電UPS,已安裝SNMP卡,可透過網路管理與監控UPS,亦可透過RS232管理監控UPS。
主機A(OS為windows),
主機B(OS為Linux),
主機C(OS為Vmware),
主機C-1(為主機C的Guest OS,OS為windows),
主機C-2(為主機C的Guest OS,OS為linux),
主機C-3(為主機C的Guest OS,安裝vMA)
一、UPS主機安裝SNMP卡後,經過設定後可經由瀏覽器連線到SNMP卡的IP以進行監控與管理。

二、當市電斷電時,UPS要如何通知底下的主機自動關機呢?必須到【網路】-【SNMP Trap】加入要通知的主機IP(即下圖的目標IP),例如主機A,主機B,主機C,這樣當市電斷電時,UPS的SNMP才知道要通知哪些主機。

三、上述步驟完成後,目標IP的主機必須要安裝Shutdown Agent 2012(下載處在http://59.125.232.140/ups/tc/index.aspx),安裝的方式及操作務必先參考原廠的中文手冊,必須要依據作業系統安裝適合的Shutdown Agent程式。
Windows(含windows server)請依32位元或64位元,安裝適合的版本(ShutdownAgent 2012 v02.00.04a 32位元版,ShutdownAgent 2012 v02.00.04a 64位元版)。
安裝完後,可在本機或遠端以瀏覽器連接主機A的IP,(預設的帳號為admin,密碼為password),點選右上角將語言界面改為繁體中文,點選【設備】-【設定】在【來源IP地址】處下方的【Trap來源IP】新增【UPS的SNMP卡的IP】,並設定【輸入電源中斷】的【作業系統關機延遲時間】,預設是300秒(5分鐘),也就是本機收到UPS市電斷電訊號後,倒數5分鐘後就會自動關機,本例修改為120秒。

四、上述安裝完後就可以測試,測試時不一定要將UPS的電源拔起,可利用SNMP管理界面中的【控制】中,點按【輸入電源中斷測試】,SNMP卡會模擬市電斷電的情況,並送出SNMP TRAP給用戶端。

五、如果沒問題的話,用戶端主機就會收到SNMP卡送來的SNMP TRAP,主機A(Windows)的本機端應該會跳出廣播訊息視窗,提醒你「輸入電源中斷」(即市電電斷),右下角會有關機的倒數計時。

六、如果是以瀏覽器連接到主機A,則會出現以下的關機倒數訊息。

七、Linux的shutdown agent程式分為ShutdownAgent 2012 v03.00.03a 32位元版 及 ShutdownAgent 2012 v03.00.03a 64位元版,安裝完後一樣是利用瀏覽器連接到主機B,並依上述的步驟設定(SNMP卡管理端輸入SNMP TRAP的目標主機,Linux主機的Shutdown Agent程式要輸入TRAP來源IP),則當UPS主機發出測試的斷電訊號時,linux主機本機端會出現收到的廣播訊號

當倒數時間結束時作業系統將會自動關機。
註:若只是要測試有沒有收到訊號,而不要關機,記得SNMP管理界面中的【控制】中,點按【輸入電源恢復測試】
Shutdown Agent若要使用在Esxi Server上,使Esxi Server在市電斷電時自動關機,則必須要有二個東西,Esxi上要安裝vMA,vMA上要安裝Shutdown Agent For Linux X64,下指令vifp addsever Esxi的IP,另外Esxi Server不能是免費版,要付費版,否則vMA會出現下列訊息,最後還是無法自動關機。

參考資料:
- Use an APC UPS to shutdown vSphere environments
- Setting up an APC UPS in ESXi
- How to install and configure VMware vSphere Management Assistant (vMA) 5.1
- How to install and manage PowerShield3 on VMware 5.x
- Graceful shutdown of an ESXi 5.1 host and guest VMs
- 利用vMA在UPS市电断电时关闭ESXi主机
- Setting up ESXi 5.1 with an APC SmartUPS connected through USB
- Installation and configuration for Winpower in the VMware ESXi (paid version)
- Installing APC UPS PowerChute Network Shutdown Software on vMA
- esxi 安裝 UPS USHA卡 system protect software 程式
- esxi 主機電源啟動設定
- 利用APC UPS的PowerChute Network Shutdown進行斷電時使Vmware ESXi中的VM關機,然後ESXi關機
- How to automatically shut down VMware ESXi gracefully during power failure using an APC UPS.
- 停電時讓ESXi Server 自動關機
- UPS管理VMware esxi Server4.1(以飛瑞Winpower為例)
- 基于APCUPSD实现断电时ESXi自动关机
- Installation and configuration for Winpower in the VMware ESXi (paid version)
- ESXi 5.0 and APC SmartUPS 1000
以下是關於Vmware Esxi free 和UPS所搜尋到的網路資料
- shutdownHostViaSOAPAPICall.pl for ESX(i) licensed and free version
- VMware PCNS ESXi 5.x Free License shutdown with APC PCNS 3.0.1 and vMA 5.x
- How to gracefully shut down vsphere 5.x (ESXi Free) using an Eaton UPS (with IPM) and the command line
- Installing the APC Powerchute Network Shutdown software on VMware ESXi hosts (1007036)
- How-To: script to shutdown ESXi Free via an USB UPS monitoring tool
- PCNS 4.0 on esxi 5.5 (free edition) agent communication
- UPS SNMP Configuration in VMWare esxi5
- NUT UPS-Dummy driver in repeater mode for Synology NAS
- Synology Network UPS (NUT) and ESXi 5.5
- how-to-shutdown-esxi-host-in-case-of-a-power-failure
- 使用putty自動登入並執行遠端主機的程式或指令
- Clean shutdown of vmWare ESXi with APC UPS
- Use PowerCli to shutdown VM’s and Hosts when running on battery.
- Using ESXi with PowerChute Business Edition(PDF)
- Graceful shutdown of an ESXi 5.1 host and guest VMs (free edition) using the shell/command line/scripting (UPS friendly)
- ESXi/ESX 4.x and ESXi 5.x/6.0 shutdown and reboot commands (1013193)
- ViewPower Pro Management Software
- VMware ESXi Shutdown Wizard User’s Manual
目前測試的結果,目前支援度以APC UPS的支援度最高,網路上能查到的相關文件也最多(但多為英文),但要以一台UPS就能支援NAS+Esxi+guest OS有困難,群輝的NAS支援(可參考這篇 http://portable.easylife.tw/4399 )最好是有USB可直接接NAS。以SNMP卡送UPS關機訊號,目前測試台達電UPS,NAS會收到斷電訊息,但不會自己關機。Esxi 要能自行關機,查了許多資料及實做後才發現,幾乎都只支援Esxi的付費版,免費版執行關機指令會失敗,一般都會要求先安裝vMA,然後再vMA上安裝UPS原廠的UPS軟體去送關機指令給Esxi Server 。但是Guest OS的支援則沒問題。
星期五, 9月 25, 2015
星期三, 9月 09, 2015
ISG-50中如何將原有的某支分機換號碼
一、Configuration->Extension Management->Authority Group->該分機所屬之群組,然後再將該分機號碼Remove,在Remove前,要先到PBX->Auto Provision,找到所要移除分機碼話機的MAC Address,然後再之抄寫或紀錄下來,等一下新增號碼與話機MAC Address對應時要用到。

二、再按【Add】建立新的號碼

三、到PBX->Auto Provision->找到新增的分機碼,按【Edit】加入該話機的MAc Address
二、再按【Add】建立新的號碼
三、到PBX->Auto Provision->找到新增的分機碼,按【Edit】加入該話機的MAc Address
ISG-50如何設定話機群組廣播
Configuration->Paging Group->加入一個群組代碼(這個代碼即是要廣播前,話機所要撥的號碼,這邊以2000為例),然後點選【Edit】後,在Extention Pool中選擇要對其廣播的話機,轉到Selected Pool,這樣下次只要話機先撥2000,就可以對代碼為2000的群組內話機進行擴音廣播。


ISG50如何將通話時間限制在一定時間內
Configuration->Outbound Line Management->LCR
選擇要限制的線路,Edit,Max. Call Time輸入要限制的時間(秒)即可,
但是這邊和傳統電話不一樣是,限制時間到之前不會有提示音,這是要注意的。

選擇要限制的線路,Edit,Max. Call Time輸入要限制的時間(秒)即可,
但是這邊和傳統電話不一樣是,限制時間到之前不會有提示音,這是要注意的。
ISG-50如何指定某支分機未接時forward到市話或手機
一、【Extension management】->【Authority Group】->【群組名稱】,這裡以AG01為例,進入AG01群組後,選擇要設定forward的分機,這裡以112為例,點選後,按【Edit】

二、在【Mobile Extension】選【Force Enable】,Number打上要Forward的手機號碼,因為本校撥市話或手機要先按前置碼【0】,所以這邊的示範號碼0937999999前的還要加上【0】,設定完後按【OK】,則如果有人撥分機112後,大約3-5秒後,手機也會響。

二、在【Mobile Extension】選【Force Enable】,Number打上要Forward的手機號碼,因為本校撥市話或手機要先按前置碼【0】,所以這邊的示範號碼0937999999前的還要加上【0】,設定完後按【OK】,則如果有人撥分機112後,大約3-5秒後,手機也會響。

星期五, 8月 28, 2015
RouterOS的校時設定
※在寫這篇文章前,原本使用中的RouterOS的NTP Client校時是正常的,但是不知從何時開始校時一直無法成功,也找不到原因,直到看到這篇討論(http://forum.mikrotik.com/viewtopic.php?t=61226)作者說只要安裝的packages就無法校時成功,才讓我想到試著將packages的ntp模組停用,接著出現了SNTP Client,校時正確,再將SNTP Client 停用,然後再將ntp 模組啟用(重開機)後,竟然NTP Client就可以校時了,所以下次如果遇到NTP Client無法校時,記得將模組停用,重開機,先試SNTP Client是否校時正常,或者再將SNTP Client停用後,再啟用ntp 模組,重開機,試試看NTP Client是否正常。以下說明如果使用SNTP Client或NTP Client校時。
一、啟用SNTP Client
RouterOS若沒有安裝packages時則校時是由SNTP Client設定,若我們已安裝了packages則可先停用ntp packages,再重新啟動RouterOS


一、啟用SNTP Client
RouterOS若沒有安裝packages時則校時是由SNTP Client設定,若我們已安裝了packages則可先停用ntp packages,再重新啟動RouterOS
二、使用NTP Client
若啟用packages中的ntp 模組後,重新啟動RouterOS

在System->NTP Client中,設定Primary NTP Server,按Enable再按Apply後,觀察視窗下方是否有出現synchronized字樣,若有出現,代表校時成功,若只有出現Started字樣,代表校時不成功( 相關校時狀態參數可參考https://www.mikrotik.com/testdocs/ros/2.9/system/ntp.php)。
星期四, 2月 26, 2015
ACFS14.04版安裝後一些問題的修正
一、登入後su切換會出現
no talloc stackframe at ../source3/param/loadparm.c:4864, leaking memory

根據
有二種方式可以解決:
二、mysql的問題
無法將mysql的服務停止,或是使用mysqladmin 無法連線mysql,會出現
rror: 'Can't connect to local MySQL server through socket '/va r/run/mysqld/mysqld.sock' (2)'
Check that mysqld is running and that the socket: '/var/run/mys qld/mysqld.sock' exists!
根據
http://askubuntu.com/questions/455029/mysql-server-start-failed
修正如下:
sudo service mysql stop
sudo rm /var/lib/mysql/ib_logfile0
sudo rm /var/lib/mysql/ib_logfile1
編輯
/etc/mysql/my.cnf
將record_buffer=64M 註解掉 (ACFS 14.04找不到)
最後
sudo service mysql restart
問題就解決了
三、關機時會出現如下的畫面,然後系統就當掉無法重開機或關機

rmmod; ERROR: Module mei_me is not currently loaded
rmmod:ERROR: Module mei is not currently loaded
根據:
這好像是網卡的趨動問題
修改 /etc/modprobe.d/blacklist.conf
加上
# Intel VPRO remote access technology driver
blacklist mei_me
問題即可解決
no talloc stackframe at ../source3/param/loadparm.c:4864, leaking memory
根據
- http://ubuntuforums.org/showthread.php?t=2214042
- https://bugs.launchpad.net/ubuntu/+source/samba/+bug/1257186
- https://bugs.launchpad.net/ubuntu/+source/sudo/+bug/1274680
- http://learninginfree.blogspot.tw/2014/05/ubuntu-sudo-talloc-stackframe-at.html
有二種方式可以解決:
- 執行sudo apt-get remove libpam-smbpass 移除libpam-smbpass這個套件,這個套件是用於同步系統使用帳密到samba資料庫
- 執行sudo pam-auth-update將SMB password synchronization註解掉不要執行

二、mysql的問題
無法將mysql的服務停止,或是使用mysqladmin 無法連線mysql,會出現
rror: 'Can't connect to local MySQL server through socket '/va r/run/mysqld/mysqld.sock' (2)'
Check that mysqld is running and that the socket: '/var/run/mys qld/mysqld.sock' exists!
根據
http://askubuntu.com/questions/455029/mysql-server-start-failed
修正如下:
sudo service mysql stop
sudo rm /var/lib/mysql/ib_logfile0
sudo rm /var/lib/mysql/ib_logfile1
編輯
/etc/mysql/my.cnf
將record_buffer=64M 註解掉 (ACFS 14.04找不到)
最後
sudo service mysql restart
問題就解決了
三、關機時會出現如下的畫面,然後系統就當掉無法重開機或關機
rmmod; ERROR: Module mei_me is not currently loaded
rmmod:ERROR: Module mei is not currently loaded
根據:
- http://askubuntu.com/questions/419853/mei-me-unexpected-reset
- https://software.intel.com/en-us/forums/topic/509689
- http://linuxxcommand.blogspot.tw/2014/07/fix-annoying-messages-meime.html#.VO6_gvmUd8E
這好像是網卡的趨動問題
修改 /etc/modprobe.d/blacklist.conf
加上
# Intel VPRO remote access technology driver
blacklist mei_me
問題即可解決
星期一, 1月 26, 2015
3com SMC的switch 校時設定
3com 4210 交換器的ntp server 校時設定
<4210>system view
[4210]ntp-service unicast-server "NTP SERVER的IP"
[4210]quit
<4210>clock timezone t8 add 08:00:00 (註:t8可自訂名稱,例如taiwan,taipei等)
<4210>display clock
12:12:03 t8 Mon 01/26/2015
Time Zone : t8 add 08:00:00
<4210>display ntp-service status
Clock status: synchronized
Clock stratum: 12
Reference clock ID: NTP SERVER的IP
Nominal frequency: 100.0000 Hz
Actual frequency: 99.9999 Hz
Clock precision: 2^18
Clock offset: 0.0000 ms
Root delay: 16.06 ms
Root dispersion: 563.47 ms
Peer dispersion: 11.43 ms
Reference time: 04:12:10.612 UTC Jan 26 2015(D8703D1A.9CB8E086)
<4210>
SMC 8126L2交換器校時設定
***************************************************************
Vty-0#configure
Vty-0(config)#sntp server 172.20.1.242
Vty-0(config)#clock timezone taiwan hours 8 minute 0 after-UTC (註:taiwan這個名稱可以自訂)
Vty-0(config)#exit
Vty-0#show sntp
Current Time: Jul 7 21:51:35 2015
Poll Interval: 16
Current Mode: unicast
SNTP Status: Enabled
SNTP Server: 172.20.1.242 0.0.0.0 0.0.0.0
Current Server: 172.20.1.242
Vty-0#
星期六, 1月 24, 2015
Zyxel NWA3160N command manage
Default name admin
password 1234
Managing the NWA3000-N Series AP: Console Port SETTING VALUE
Speed 115200 bps
Data Bits 8
Parity None
Stop Bit 1
Flow Control Off
Router> configure terminal
Router(config)#show running-config (秀出設定內容)
Router(config)# show capwap_wtp ap discovery-type (秀出控制器的發現型式)
Discovery type : Broadcast
Router(config)# capwap ap vlan ip address 192.168.1.37 255.255.255.0(設定client Ap的Ip)
Router(config)# capwap ap vlan ip gateway 192.168.1.32(設定client Ap的gateway)
outer(config)# capwap ap ac-ip 192.168.1.1 192.168.1.2(設定控制器的IP,若IP只有1個,則後面要加遮罩,例255.255.255.0)
Router(config)# show capwap ap discovery-type
Discovery type : Static AC IP
Router(config)# show capwap ap ac-ip
AC IP: 192.168.1.1 192.168.1.2
Router(config)# exit
Router# show capwap ap info (秀出是是否有找到控制器)
SM-State RUN(8)
msg-buf-usage 0/10 (Usage/Max)
capwap-version 10118
Radio Number 1/4 (Usage/Max)
BSS Number 8/8 (Usage/Max)
IANA ID 037a
Description AP-0013499999FF
Router# write(寫入設定檔)
Router# show version(秀出firemware的版本)
Router# show version(秀出firemware的版本)
星期五, 1月 09, 2015
ISG50的內部分機號碼如何和NGN網路電話號碼做對映
一、CONFIGURATIO->PBX->OutboundLine Management->Outbound Trunk Group>【Trusted Peer Settings】內的自訂的TANET選擇,點選【Auto Attendant】

二、增加DDI/DID Mapping Summary的對映號碼(註:Direct Inward Dialing (DID) or Direct Dial-in (DDI) )如果已達上限無法加入,就要使用command

三、但是32組號碼後,已不能利用web方式增加,這時就要利用指令方式(command mode)

四、以telnet進入ISG-50的console端中,
#enable
#configure terminal
#pbx outbound-trust-peer TANet
#ddi-mapping 907004999_999
#write
這邊是以907004999對應到分機999為示範

訂閱:
文章 (Atom)